SSH (Secure shell)#
SSH, or Secure Shell, is a remote communication protocol that allows users to interact with remote servers over the Internet.
It provides a mechanism to authenticate a remote user, transfer input from the client to the host, and relay output back to the client in a secure manner.
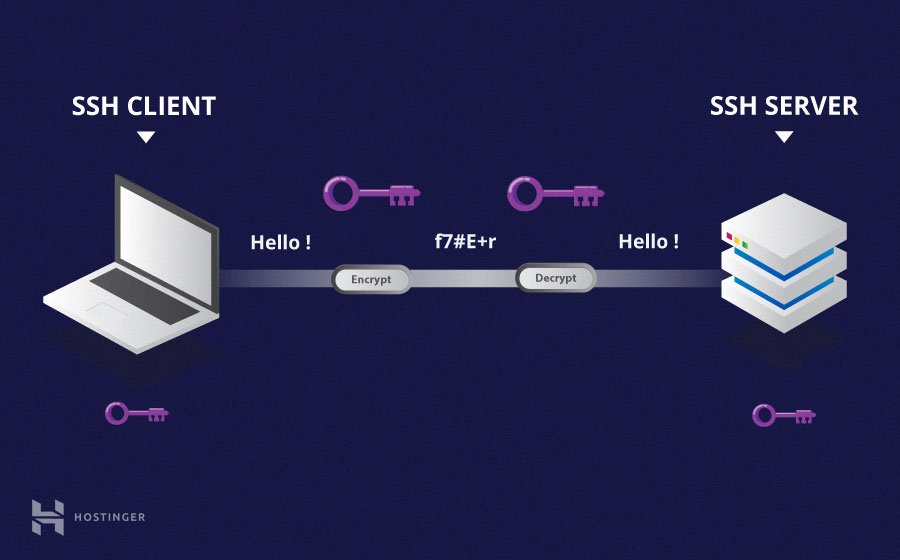
Fig. 20 Schematic of an SSH transaction. Credit: Hostinger#
SSH client#
If you are using GNU/Linux or macOS, then using SSH is straightforward and a terminal will natively support it.
If you are using Windows, you will need to use an SSH client to open SSH connections.
A SSH client comes with a few command-line tools, among which the most useful are
sshto interactively connect via the SSH protocol and send commands
ssh-keygento generate a pair of asymmetric keys
ssh-copy-idto register a public key on a remote server
SSH basics#
A basic connection on a remote server with SSH is achieved with
ssh <username>@<hostname>
<username> represents the username of the account you wish to access and
<hostname> refers to the remote server, which can be an IP address (e.g. 244.235.23.19) or a domain name (e.g. www.xyzdomain.com)
User authentication methods on remote servers#
- Password
Although passwords are encrypted, it is not recommended to use passwords for secure connections. This is because many bots can brute force easy passwords or default passwords, and access your account and having to remember a complex password for each server is very difficult.
- Asymmetric keys (recommended method)
This is a set of asymmetric keys used to authenticate the user without having to enter a password. It improves the security and simplifies workflows at the same time. Each user has a private key and a public key that can be shared with the remote servers. The private key must remain private. We will see below how to generate such pair of keys and register them on to the remote servers.
Note
Keys are also used to authenticate git commits.
One should always associate a key with their account on GitHub, GitLab, etc.
Generation of a SSH key pair#
There are several algorithms used to generate SSH keys. Some are outdated and some are not yet supported on all servers
RSA – Default and most popular algorithm. It is based on the difficulty of factoring large numbers. A key size of at least 4096 bits is recommended for RSA. RSA is getting old and significant advances are being made in factoring. Choosing a different algorithm is advisable where possible.
DSA – An old US government Digital Signature Algorithm. It is based on the difficulty of computing discrete logarithms. A key size of 1024 would normally be used with it. DSA in its original form is no longer recommended.
ECDSA 👈 – A new Digital Signature Algorithm standardized by the US government, using elliptic curves. This is the recommended algorithm for current applications/service if supported. Only three key sizes are supported: 256, 384, and 521 (sic!) bits. Most SSH clients now support this algorithm.
ED25519 – This is one of the new algorithms added in OpenSSH. Support for it in clients is not yet universal. You need to check the documentation of the SSH clients and servers, if they support this algorithm.
Example#
We will generate a pair of keys with the elliptic curve algorithm and a size of 521 bits
ssh-keygen -t ecdsa -b 521 -C "daenerys@castlerock"
This should output something like
Generating public/private ecdsa key pair.
Enter file in which to save the key (/home/daenerys/.ssh/id_ecdsa):
Enter passphrase (empty for no passphrase):
Enter same passphrase again:
Your identification has been saved in /home/daenerys/.ssh/id_ecdsa
Your public key has been saved in /home/daenerys/.ssh/id_ecdsa.pub
The key fingerprint is:
SHA256:Go5oxc3cEjdrG4ZYDDl4TlFQ6WyBeIC6gMvmXIcXPHs daenerys@castlerock
The key's randomart image is:
+---[ECDSA 521]---+
| ..++Bo.         |
|. o Boo          |
|o  =.++.o        |
|+  ..X+= o       |
|oo  =.@ S        |
|oo = * E o       |
|+ + + + .        |
| +               |
|                 |
+----[SHA256]-----+
Exposing the public key#
The next step is to provide the remote server with the newly created public key to be able to authenticate through the SSH handshake.
For this use ssh-copy-id on the terminal such as
ssh-copy-id -i ~/.ssh/id_ecdsa daenerys@castlerock
and enter your password this one time.
Use the -i option to provide the desired key for the server.
Hint
Even though it seems we are copying the private key (which does not have the .pub extension, ssh-copy-id will make sure only the public key is copied over.
SSH config#
To manage multiple SSH servers, it is possible to create a config file on your machine to easily connect.
touch ~/.ssh/config
chmod 600 ~/.ssh/config
Example#
Host targaryen
    User dany
    HostName targaryen.in2p3.fr
    IdentityFile ~/.ssh/id_ecdsa

Host tyrell
    HostName 192.168.10.20

Host martell
    HostName 192.168.10.50

Host *ell
    User dragonqueen

Host * !martell
    LogLevel INFO

Host *
    User root
    Compression yes
Usage#
In the terminal, use the host alias to connect
ssh targaryen
All the options specified in the ssh config file will be taken into account.
Advanced usage#
Connecting through a proxy#
Sometimes a remote server is only accessible from a local network and thus not exposed on the internet. This is the case for the APC computing clusters for instance.
In such case, one has first to connect to a bastion, a remote server that serves as a bridge between internet and the local network, before being able to connect to the desired server.
ssh -J daenerys@got-bastion.in2p3.fr targaryen
To avoid having to do the two connections in a row, one can specify in the config that the connexion should go through that bastion
Host got-bastion
    User daenerys
    HostName got-bastion.in2p3.fr
    IdentityFile ~/.ssh/id_ecdsa_bastion

Host targaryen
    User dany
    HostName targaryen.in2p3.fr
    IdentityFile ~/.ssh/id_ecdsa
    ProxyJump got-bastion
Then connecting to targaryen will just be as simple as
ssh targaryen
Port forwarding#
For security reasons or specific needs, one sometimes needs to redirect the local ports of your machine to those of a remote web server (e.g. for VNC, or access to a specific website).
The way to do that is to connect to the host while providing the desired ports to forward to, e.g. here with the port 8080 (used for instance for a Jupyter webserver)
ssh -L 8080:targaryen:8080 got-bastion
If this is something regular, one might want to add that to the SSH config so each connection will also add the local port forwarding. In this case, since the server is behind a proxy, one needs to do the port forwarding at the proxy level.
Host got-bastion
    User daenerys
    HostName got-bastion.in2p3.fr
    IdentityFile ~/.ssh/id_ecdsa_bastion
    LocalForward 8080 targaryen:8080

Host targaryen
    User dany
    HostName targaryen.in2p3.fr
    IdentityFile ~/.ssh/id_ecdsa
    ProxyJump got-bastion
Then for the port forwarding to be enabled one must execute in a terminal
ssh -fN got-bastion
The -f option will run the SSH session in the background and -N will disable remote command execution for security.